
Table of Contents
Setting Up Your NetSuite Integration
Important Note: You may need an Administrator to help set up and gather the information below. Additionally, in order to see NetSuite's Internal IDs please enable Show Internal IDs in your preferences page.
- Internal LocationID (optional)
- Internal DepartmentID (optional)
- Internal SubsidiaryID (optional)
- SCompID (required) - This can be found at the beginning of the URL
- ConsumerKey (required) - See below on how to create this
- ConsumerSecret (required) - See below on how to create this
- TokenID (required) - See below on how to create this
- TokenSecret (required) - See below on how to create this
- FolderID (optional) - This is the internal ID of the File Cabinet folder and allows us to sync over invoice images.
Additional Information on how to gather the elements listed above:
1) Identifying the internal Location ID, Department ID, or Subsidiary ID in NetSuite -
- Setup -> Company -> Location/Department/Subsidiary
- There will be an Internal ID next to your Location/Department/Subsidiary. Please provide the specific ID for the NetSuite instance we should be using per Craftable store. If you have multiple outlets you’re integrating with, we’ll need the corresponding IDs for each outlet as it may vary depending on your setup.
Important Note: Craftable is compatible with NetSuite accounts that use subsidiaries, locations, departments, or any mix of these structures. Please inform your Integration Specialist which of these apply to your account to ensure accurate mapping.
2) Creating the Integration Record in NetSuite (Consumer Key & Consumer Secrets) -
- Setup -> Integrations -> Manage Integrations -> New -> Set the name as Craftable Integration & follow the below -> After, click Save
- Authentication: enable TOKEN-BASED AUTHENTICATION
- OAuth 2.0 -> SCOPE: enable RESTLETS, REST WEB SERVICES, & SUITEANALYTICS CONNECT
- User Credentials: enable USER CREDENTIALS
After you click Save, the Client Credentials (Consumer Key & Consumer Secret) will display at the bottom.
Important: The Consumer Key and Secret only show up once. Copy these values and send them to your integration specialist.
3) Creating the Integration Role (Permissions) -
If you are comfortable with giving Craftable the Administrator role, skip this step. If not, please follow below.
- Setup → Users/Roles → Manage Roles → New -> Set name as Craftable Integration Role & follow the below -> After, click Save
- Subsidiary Restrictions: enable ALL
- Authentication: enable WEB SERVICES ONLY ROLE
- Permissions: Ensure each permission has the Full LEVEL
- Transactions: assign Bills, Credit Memo, Enter Vendor Credits, Make Journal Entry (Optional)
- Lists: assign Accounts, Vendors, Subsidiaries, Locations, Departments, Documents and Files
- Setup: assign Login Using Access Tokens, SOAP Web Services, Set Up SOAP Web Services
Important Note: NetSuite is very customizable so the generic permissions above may not meet all your requirements. Please connect with your integration specialist and we can review any permission related issues via NetSuite's Web Services Usage Log.
4) Creating the Web Service User -
Depending on your NetSuite subscription, you can add a new Craftable User (instructions below) or use an existing user. If you'd like to use an existing user, simply add the Craftable Integration Role to their employee record. Important - If this employee is ever deactivated or removed then this will disconnect the integration between Craftable and NetSuite.
- Lists -> Employees -> Employees -> New -> Set name as Craftable & follow the below -> After, click Save
- Classification: assign any Subsidiary/Location/Department, if required (*)
- Access: enable GIVE ACCESS
- Roles: assign Craftable Integration Role
5) Generating the Access Tokens (Token ID & Token Secret) -
- Setup -> Users/Roles -> Access Tokens -> New -> follow the below -> After, click Save
- Primary Information:
- Application Name: select Craftable Integration
- User: select the new User (Craftable) or existing User from Step 4
- Role: select Craftable Integration Role
- Token Name: enter Craftable Token
- Primary Information:
After you click Save, the Access Token (Token ID & Token Secret) will display at the bottom.
Important: The Token ID and Token Secret only show up once. Copy these values and send them to your integration specialist.
After all the above steps are completed, please send back the requested information to your integration specialist. If you encounter any issues, please do not hesitate to reach out to our team. We are here to help you!
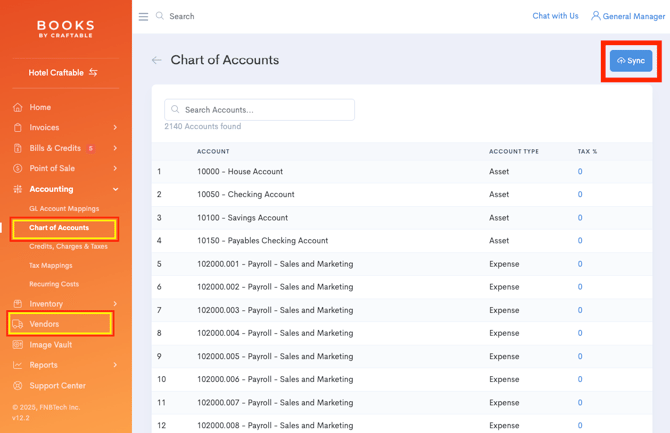
Once Integration is Complete
Once our team completes your NetSuite integration you will be able to successfully click the Sync button on the Chart of Accounts page or Vendors page in Books. Clicking this Sync button will trigger a pull from NetSuite to Craftable that will pull in your Chart of Accounts (GL Codes) and Payee (or Vendor) codes to connect your Craftable vendors to their record in NetSuite.
If you aren't familiar with Books we recommend reviewing the Books Training article for steps on completing your configuration in Books to sync to NetSuite. This same "pull" of data from NetSuite will also occur every time you sync your Bills and Credits to NetSuite.
Frequently Asked Questions (FAQs)
What dimensions within NetSuite is Craftable compatible with?
Craftable is compatible with NetSuite accounts that use subsidiaries, locations, departments, or any mix of these structures. Please inform your Integration Specialist which of these apply to your account to ensure accurate mapping.
Do I need to have the same data structure for both my Bills and Credits in NetSuite?
Yes - your Bills and Credits must be structured identically or very nearly so. If required dimensions are not available in one this will cause the sync to fail. For example, if you use Locations on your Bills but not on your Credits you will receive an error response when attempting to sync a Credit, as we will include Locations but have no valid field to sync it into.
Does clicking "Sync" at the top of the Chart of Accounts or Vendors page sync my Bills to NetSuite?
No - the Sync button on those pages just pulls data, specifically your Payees, General Ledger codes, and Classes if activated. This same pull will also occur each time you do choose to Sync your Bills, but syncing Bills only happens from the "Bills/Credits Sync" page.