
Prepare for your First Audit
If you have time before your first Audit, we recommend doing the following steps:
- Review this training video below on Taking an Audit:
- Take a practice Audit via a guided walkthrough, just click here!

- Take a practice Audit on your account. As long as no one has started taking a real audit you can click Start New Audit, practice entering counts, and then be sure to click Delete Audit at the end so your practice counts are not included in your real audit. To start a new Audit click Inventory > Audit > Start new Audit. When you're done click Save and Continue and select Delete Audit.
- Set your Storage location names, then set Item Availability. If you have time you can even make the system shelf-to-sheet by entering Bin locations.
- Planning to use your phone or tablet?📱 You can use one of our Apps or just navigate to app.craftable.com to log in and get going!
During your First Audit
- Start by selecting the name of the Storage area you are physically in at the top left, and then start entering counts.

- To enter a count just click on the Item's Name:
- Then enter the count of the item using the calculator buttons:
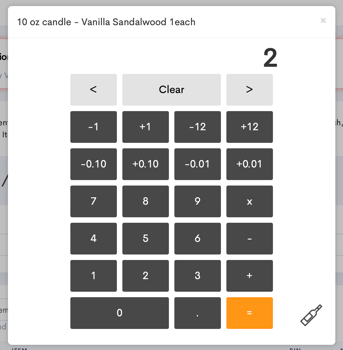
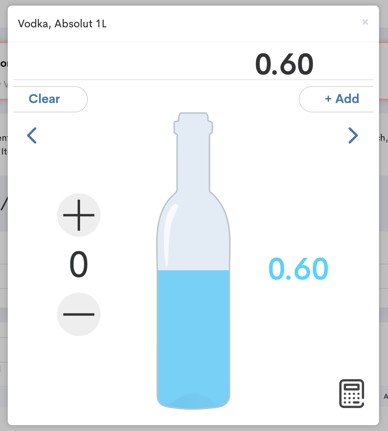
Be sure to enter the count of the item to the Count Unit. This is the number and unit of measure at the end of the Item Name and defines in what size an item should be counted. - If you're counting in beverages, use the bottle slider count option, especially if you're counting open bottles. Just click the bottle icon at the bottom right of the calculator to switch to this mode, where you can add full bottles using the large plus sign at the left, or click on the bottle and drag to select how full any partial bottles are. Click the calculator at the bottom right to switch back to the calculator.
- Missing Items? You may find as you count that some items that need to be inventoried weren't included in your initial upload. Just click the Add button at the top of the screen, select New Item, and add the item in right then. Once you navigate back to the Audit it will be available in your currently open Audit.
Closing your Audit
- Ensure that all members of your team have finished counting, and click "Sync" on their devices to ensure all offline counts are synced.
- To close the Audit click Save & Continue > Close Audit. On the "Confirm your Audit Date" screen select the date that the counts were accurate for as of the end of that date. (So if you start counting Sunday night and finish up on Monday morning, you should select Sunday's date.) Then select the check box below to confirm.
- From the next screen, "Close Audit", you can choose to enter a note or just leave it blank, and then select Close Audit.

- Note: for stores without a POS integrated - On the "Add your POS Sales" screen you can choose from Category, Total, or Unavailable. We highly recommend entering some POS Sales so that you can get your Cost %. On the Bevager side you should typically select Category and on the Foodager side you should typically select Total. If your POS is integrated and your POS Groups mapped this will pre-fill with your POS sales numbers, but even if you don't have the integration you can run a report from your POS and enter the sales numbers.
Congratulations!
You've completed your first Audit! 🎉 🎊
The real magic starts to happen when you get 2 audits under your belt so how can you make your next audit even more efficient?
Feel free to review the sections above on creating Storage Areas, allocating items to those Storages, and even setting Bins. Also if you noticed any items were missing during the audit you can always add them!